Displaying the Skill Tree (UI Setup)
The plugin comes with a complete, pre-made UI that is ready to use. No complex setup is necessary to get it working; you just need to display it on screen.
You can check the Quick Start Video for a quick way to add the UI to screen on an empty project!
Displaying the Default Skill Tree UI
Follow these steps to show the skill tree in your game.
- In your player's code (e.g., in the Player Controller or Character Blueprint), find an appropriate event to open the UI, such as an input press event.
- From that event, use the Create Widget or Push Widget To Layer Stack node to create the main display widget. The class to select is
W_SkillTree_Display, which is included with the plugin. - Take the return value from Create Widget or Push Widget To Layer Stack and call Set Skill Tree Type Tag and pass it the tag of the skill tree that you want to show. For the Skill Tree Type Tag input, pass in the tag you configured on the
CrimsonSkillTreeManager(e.g.,SkillTree.Player.Core). - Take the return value from Create Widget and call Add to Viewport.
Here you can see an example of how its added in the Lyra Starter Sample project.
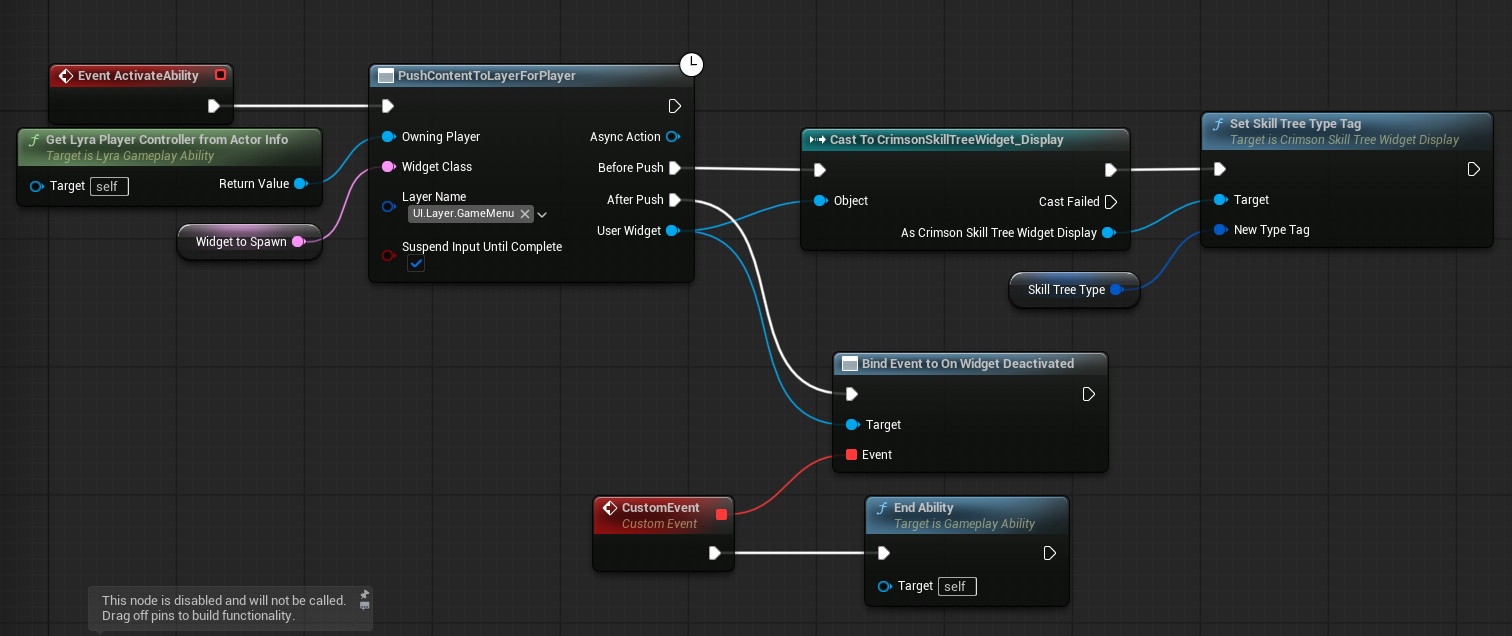
Make sure you set the skill tree type tag before the widget is pushed onto the screen. This must be set before OnActivated is called on the CommonActivatableWidget
That's it! The display widget will automatically find the correct skill tree from the manager and populate itself with the nodes, connections, and data you've created.
Customizing the UI (Optional)
If you wish to change the appearance or behavior of the UI, you can create child classes of the provided widgets and override their logic. You should not modify the plugin's widgets directly.
You should see the provided W_SkillTree_Node,W_SkillTree_Display, W_SkillTree_Graph and other blueprints for an example of how they should be set up!
Example: Creating a Custom Node Appearance
The most common customization is changing how a skill node looks. Here’s how you would do that:
- Right-click in the Content Browser and create a new Widget Blueprint.
- In the "Pick Parent Class" dialog, search for and select
UCrimsonSkillTreeWidget_Node. This will be the parent of your new custom node. Name it something likeWBP_MyNode. - Open your
WBP_MyNodeand design it however you like (e.g., add new borders, images, or text blocks). - In the Event Graph, you can override the On Update Node Appearance event. This event fires when the node's state changes. You can use the data from this event to change your widget's appearance (e.g., changing a border color from grey to gold when the node becomes active).
-
Telling the graph to use your new node:
- Open the main skill tree asset (e.g.
CST_Player_CoreSkills). - In its Details panel, find the Graph Config -> Node Type to Widget Class Map setting.
- Here, you can map a Gameplay Tag to your new
WBP_MyNodewidget. When the graph is built, any node with that tag will use your custom widget instead of the default.
- Open the main skill tree asset (e.g.