Setting Up a Character
This guide explains how to add the Skill Tree Manager to an actor and configure it to use your skill trees. The CrimsonSkillTreeManager is an Actor Component that should be added to the actor that will own the skills.
Multiplayer Note: For multiplayer games, it is highly recommended to add the manager to the PlayerState, as it persists across pawn deaths and respawns.
A Note on Flexibility: While these examples focus on the Player State and Character, the CrimsonSkillTreeManager can be added to any actor. This allows you to implement progression systems for AI enemies, upgradable turrets, or any other object in your world.
Step 1: Adding the Skill Tree Manager
You can add the component in several ways depending on your project's structure.
Method 1: Using the Blueprint Editor
- Open your character Blueprint (e.g.,
BP_MyPlayerCharacter) or your Player State Blueprint. - In the Components tab, click
+ Addand search forCrimsonSkillTreeManager. Select it to add it to the component list.
Method 2: Using C++
For C++ projects, you can add the component directly in your actor's header and source files.
- In your Actor's header file (.h): Forward declare the component and declare it.
class UCrimsonSkillTreeManager; // ... inside your class definition ... UPROPERTY(VisibleAnywhere, BlueprintReadOnly, Category = "Skill Tree") TObjectPtr<UCrimsonSkillTreeManager> SkillTreeManager; - In your Actor's source file (.cpp): Create the component in the constructor.
#include "MyCharacterClass.h"
#include "CrimsonSkillTree/Public/CrimsonSkillTreeManager.h"

AMyCharacterClass::AMyCharacterClass()
{
    // ... other code ...
    SkillTreeManager = CreateDefaultSubobject(TEXT("SkillTreeManager"));
}
Method 3: Using a Game Feature Action
This method will be different depending on how your project has Game Features set up. We will use the Lyra Starter Game as the template for these instructions.
This is an advanced method ideal for modular, encapsulated content using the Game Features framework.
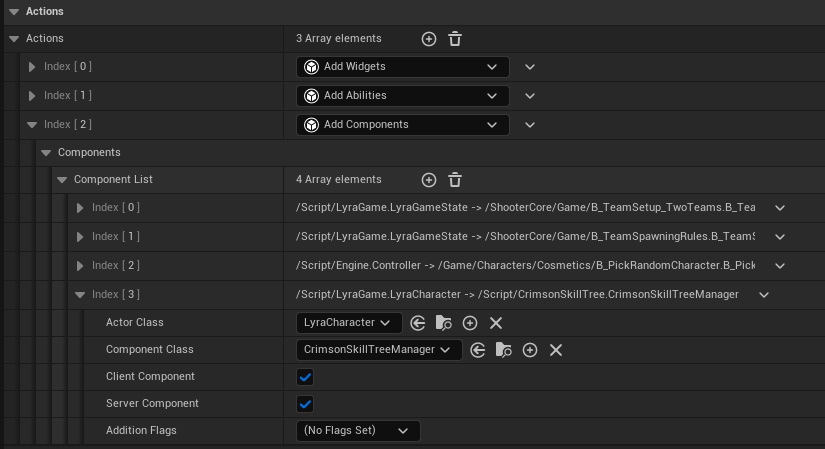
- In your Experience Definition, got to Actions, add a new array element and select Add Crimson Skill Tree.
- Select the actor class of type ACharacter or APlayerState.
- Set the component as Client and Server.
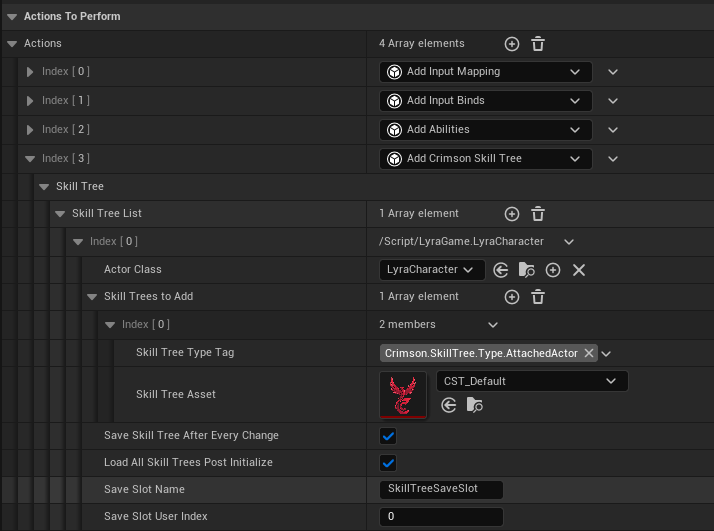
- In your Experience Actions Set, got to Actions, add a new array element and select Add Crimson Skill Tree.
- Under Skill Tree List, add an new element.
- The ActorClass MUST match the one you used in your Experience Definition.
Step 2: Implementing the Interface
To provide a standardized way of accessing the skill tree system, you should implement the ICrimsonSkillTreeInterface on the same actor that has the manager component (the Character or Player State). This allows other parts of your game to easily get the correct references without casting.
Method 1: Using the Blueprint Editor
- Open the Blueprint that contains your Skill Tree Manager component.
- At the top of the editor, click on Class Settings.
- In the Details panel on the right, find the "Interfaces" section. Click the "Add" button.
- Search for and select CrimsonSkillTreeInterface from the list.
- After adding it, the interface's functions (e.g., `GetSkillTreeManager`) will appear in the "My Blueprint" panel. Double-click on a function to implement it. For `GetSkillTreeManager`, simply drag in your manager component and connect it to the return node.
Method 2: Using C++
- In your Actor's header file (.h): Include the interface header and add it to your class's inheritance list.
#include "CrimsonSkillTree/Public/ICrimsonSkillTreeInterface.h" class YOURPROJECT_API AMyCharacterClass : public ACharacter, public ICrimsonSkillTreeInterface { // ... }; - You must then provide public overrides for the interface functions.
// In the public section of your header file (.h)
virtual class UCrimsonSkillTreeManager* GetSkillTreeManagerComponent_Implementation() const override;
virtual class AActor* GetSkillTreeOwner_Implementation() const override;
virtual class ACharacter* GetSkillTreeOwnerCharacter_Implementation() const override;
A Note on Flexibility: The interface provides a powerful separation between where skill tree data is managed and which actor receives the skill effects. For instance, you can place the UCrimsonSkillTreeManager on the Player State for persistence, while the interface directs effects like stat boosts to the currently possessed Character.
This extensibility also allows skills to affect other objects. By creating a custom NodeEvent, you could use the interface to find the character's equipped weapon and apply a stat modification directly to it. This would allow a passive skill to grant a "+10% Fire Damage" bonus to a sword actor whenever it's equipped.
As always, you are encouraged to add more interface functions for your specific game needs!
Step 3: Configuring the Manager
With the CrimsonSkillTreeManager added, select it in the Components tab (or open its defaults in the GFA) to see its Details panel.
-
Configured Skill Trees: This is the most important setting.
- Click the
+to add a new element to the array. - Skill Tree Asset: Assign the
CST_Player_CoreSkillsasset you created earlier. -
Skill Tree Type Tag: This is a unique identifier. You need to create a Gameplay Tag for it.
- Go to
Edit>Project Settings>Project>Gameplay Tags. - Add a new tag, for example,
SkillTree.Player.Core. - Back in your character Blueprint, set this tag on the manager.
- Go to
- Click the
- Save Game Settings: Configure the
Save Slot NameandUser Indexif you want the system to automatically save and load player progress.
Important: Each Skill Tree Type Tag must be unique on a single Skill Tree Manager. The manager will only initialize one tree per tag, so you cannot have duplicate tags on the same component.
The manager handles initialization in void UCrimsonSkillTreeManager::BeginPlay()